What do teachers need to think about
to prepare and use graphic organizers?
Steps involved in the preparation and use of a graphic organizer
Step 1: Plan a lesson activity
Create a lesson activity that lends itself well to the use of a graphic
organizer.
Example:
To illustrate the steps, we will use "Stereotypes
of the French", a unit designed by one of the CoBaLTT participants
in the past that is currently posted in the "Lesson Plan/Unit Room"
section of the CoBaLTT homepage. More precisely, we will use a graphic
organizer to support an activity designed for "Lesson1:
Stereotype Simulation", the first chapter of this four lesson
unit.
Step 2: Identify a graphic organizer
Select a graphic organizer that matches the underlying purpose of the
lesson activity. If necessary, return to the previous Overview
of Graphic Organizers to find one that corresponds to the thinking
skill(s) associated with the task.
Example:
In day 1 of Lesson1:
Stereotype Simulation students are required to imagine and write down
what a typical French person looks like and what a typical French person
does. Students first write their lists in English. The teacher then encourages
whole class discussion and provides students with necessary French vocabulary.
Although a graphic organizer is not used in the original lesson plan,
we rethought the lesson activity somewhat to incorporate the use of one.
This activity could be expanded to ask students to compare and contrast
their descriptions in assigned pairs. They would need to list
the characteristics that describe a “typical French person”
and then compare/contrast those characteristics with
a partner. These two thinking skills could be supported by the use of
a graphic organizer.
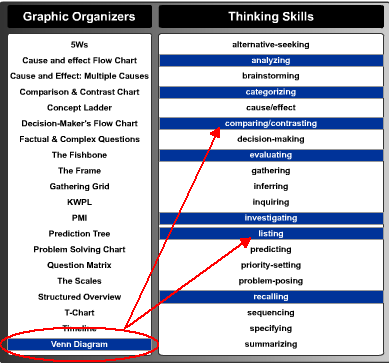
Once the thinking skills are identified, the task is then
to find which of the many graphic organizers provided is most appropriate
for the activity. We view the table in the Overview
section to select the appropriate graphic organizer and choose a Venn
Diagram, because it targets both “listing" and “comparing/contrasting.”
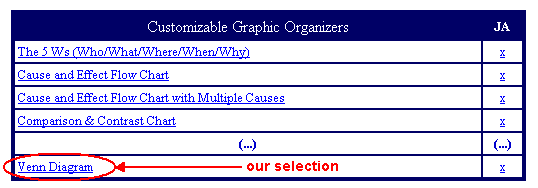
Step 3: Open the template
After the appropriate graphic organizer is identified, follow the link
to the template section where
you will find a list of graphic organizers that can be modified and
printed. Click on the selected graphic organizer in the list provided
to see a model.
Example:
The image below illustrates this step:
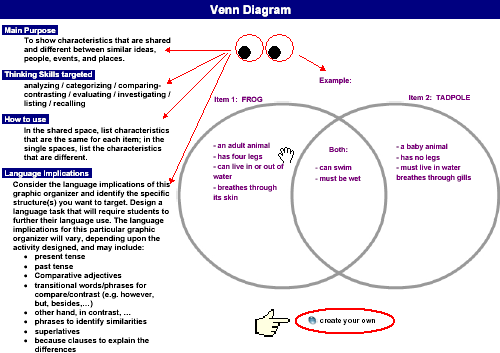
Step 4: Review the model
To familiarize yourself with the selected graphic organizer, read through
the information provided—the purpose, thinking skills targeted,
tips on how to use it (with example provided), and the list of possible
language implications, that is, some of the possible language structures
that may be targeted with the selected graphic organizer. When
finished, click on the "create your own" button at the bottom
of the page.
Example:
Following our example, we would access the model provided for the Venn
diagram and spend some time familiarizing ourselves with the use of this
specific graphic organizer before proceeding to the next section.
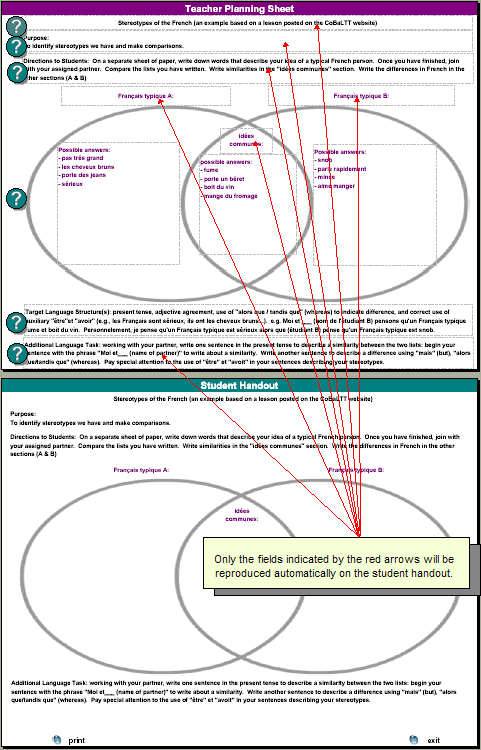
Step 5: Complete teacher Planning Sheet
After clicking on the "create your own" link,
you will be directed to the “Teacher Planning Sheet” template
where you will need to insert the necessary information in the target
language or English in the fields indicated by grey dotted lines. For
example, the topic of the activity for which the graphic organizer will
be used, the purpose of the activity, directions to students, etc.
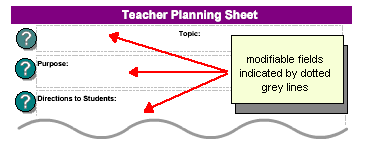
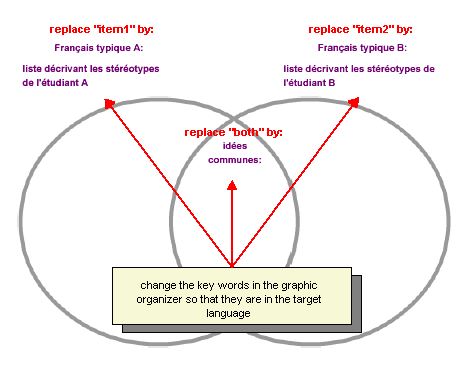
Depending upon the proficiency of the learners, some information
may be written in English (e.g., directions to students). But key words
on the graphic organizer itself (e.g., "item1:", "item2:",
"both:" in the Venn diagram) should be changed to the target
language. Here is an example of how the diagram could look like for
an activity designed for the French lesson we have been using as an
illustration so far:
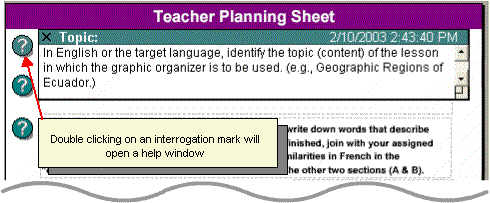
If you have questions about a field, double click on the
"question" button at the left to find an explanation and example.
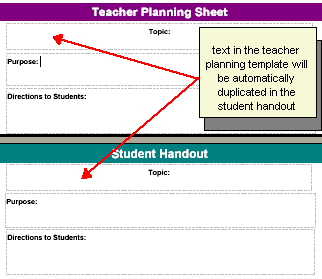
As you are inserting information in various fields, the
same information is being duplicated on the "student handout"
(except for the target structures field) that you will be able to print.
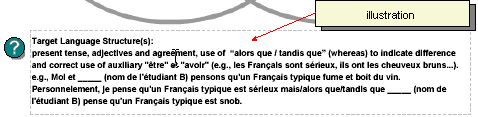
At the bottom of the page there
are fields emphasizing language use. In the "target language structure
" field, identify the language structure(s) that you want to target
in this activity. For example, following the illustration for the lesson
"stereotypes of the French", we could use the Venn diagram
to target: correct use of auxiliary être and avoir,
adjectives and agreement, use of conjunctions mais, only to name
a few. The targeted language structures are for the teacher planning
sheet only.
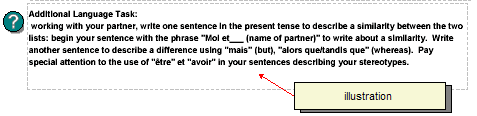
Finally, describe "the additional language task"
you want students to complete once they have filled in the graphic organizer.
In the Venn Diagram, for example, students could be asked to write a
sentence in the present tense to describe a similarity between the two
lists. In addition to the comparison, the students could also be asked
to use the conjunction mais (as well as tandis que/alors que)
to indicate a difference between the two lists (see illustration below).
Example:
Following our example, here is a what a completed "Teacher
Planning Sheet" might look like:
Clicking on the image will open a new webpage and allow
you to have access to the actual document so that you can review its content.
When done, simply close the window to revert to this walk-through.
Step 6: Check student handout & Print
When you have completed the "Teacher Planning Sheet",
check the information on the student handout and verify that all is
accurate and appears as you would like.
If you need to make changes, either use the "PgUp"
key on your keyboard or simply scroll up to go back to the "Teacher
planning sheet" template.
Once the student handout is complete, print for use in
your classroom. Make sure to use the print button located at the bottom
of the handout.
Both the "Teacher Planning Sheet" and the "Student
Handout" will print at the same time.
Step 7: Save
your changes
It is now possible to save the changes you add into the
templates, just "save" when you are finished. This Acrobat
feature should also allow you to re-open and make additional changes.
If you are not able to just save the PDF file with your changes in
it, you can try this:
On a Windows machine, download "pdf995"
and install it according to the instructions. When you are finished
making changes to the "Teacher Planning Sheet" and the "Student
Handout", click the command to print, and choose "pdf995"
as the printer. It will save the changes to a new pdf file.
On Mac OSX, click the command to print. In the print
window, go to the "output options" (in the 3rd pull-down
menu at the top of the window) and check the "save as file"
box, and choose for format "pdf." It will save the
changes to a new pdf file.
You will not be able to make additional changes to this saved document
unless you have the full version of Acrobat.
|